![]()
Primary Colors: The Art of Chemistry

Learning Goals
- Prepare samples for UV-visible analysis.
- Collect data on a UV-visible spectrometer.
- Analyze spectra of primary colors.
- Analyze a spectrum of a secondary color.
Abstract
Chemistry is often believed to belong only to the sciences. Artists, though, have been using chemistry for thousands of years. How? To make different pigments for painting, dyeing cloth, or decorating pottery. Most paints are made using a colored chemical compound (ex. cobalt for blue, cadmium zinc sulfide for yellow, or iron oxide for red ) mixed in a binder compound (ex. gum arabic for watercolor paint, linseed and petroleum oils for oil paints, and synthetic compounds for acrylics).
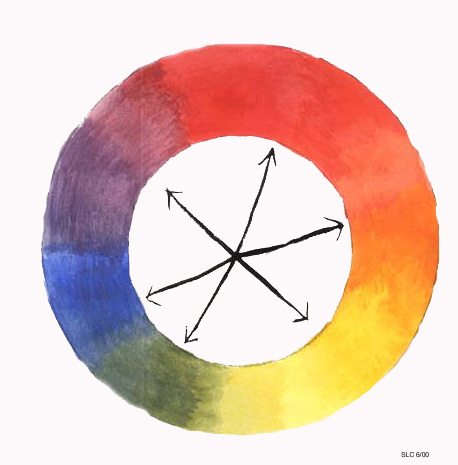
A color wheel, used in art class to describe how to prepare different colors, also shows how primary colors relate to secondary colors. The primary colors are red, yellow, and blue. They cannot be made by mixing other colors. Mixing two primary colors , however, produces new colors, called secondary colors. These colors are orange, green, and blue. Here's how the primary colors combine:
Yellow + Blue ----> Green
Yellow + Red ----> Orange
Blue + Red ----> Purple
On a color wheel, the secondary colors lie between the two primary colors that make the secondary color.
A Color Wheel: Secondary Colors Lie Between the Two Primary Colors
In this experiment, you will use a UV-visible spectrometer to analyze primary and secondary colors. You will first obtain spectra of the primary colors (red, blue, and yellow). You will then obtain a spectrum for an assigned secondary color. The spectrum for each color has a unique shape (absorbance) and location of peaks (wavelength). Based on the shape and location of the peaks, you can determine the mixture of colors in your assigned color solution. For an orange solution, for example, you will use the UV-vis spectrometer to prove "red and yellow make orange."
Pre-lab Assignment
In your lab notebook, prepare the following information:
- A brief (2-3 sentence) introduction to the lab.
- A table of safety information including the chemicals used in the lab and any safety handling precautions. This information can be obtained from the MSDS safety sheets.
- A procedure that incorporates your individual assignment into the general procedure shown below.
Give this assignment to your teacher at the beginning of the lab. You will not be allowed to work in the lab without this information.
Procedure
| Chemicals Needed | Equipment and Supplies Needed |
|
|
- Obtain 5 clean, dry cuvettes.
- Fill the first cuvette half full with distilled water. This solution will be used to "blank" the UV-vis spectrometer.
- Solution 1 Fill the second cuvette half full with blue food coloring.
- Solution 2 Fill the third cuvette half full with red food coloring.
- Solution 3 Fill the fourth cuvette half full with yellow food coloring.
- *Secondary Solution 1 Fill the fifth cuvette half full with your secondary color (green, orange, or purple) assigned from the Lab Navigator.
- Take all of your samples to the UV-vis spectrometer. If you are using a data disk, insert it into the computer (Your data files will be automatically saved to this disk.).
- To log on to the UV-vis spectrometer, enter your account name.
- To blank the instrument, first wipe the clear sides of the cuvette containing distilled water with a KimWipe or similar tissue. This removes any moisture or fingerprints from the outside of the cuvette. Insert the cuvette with distilled water into the instrument holder. The blank records what the solvent and cuvette "look like." The instrument then will electronically subtract the cuvette and solvent when it records a spectrum. (TIP: The clear sides of the cuvettes must align with the holes in the sides of the sample compartments. The ridged lines should face the front of the machine.) Click on the 'blank' button.
- To scan the blue solution, insert the cuvette into the instrument holder and click on the scan sample button. Record the filename of your sample. (The file name includes the date the sample was taken and the sample number. For example 010922.1 represents the first sample taken on September 9, 2001)
- Scan the red solution. Record the filename.
- Scan the yellow solution. Record the filename.
- Scan your assigned color. Record the filename.
- Exit the instrument program and return your samples to the lab. Do not dispose of your samples until you have analyzed your data.
- Analyze your data by using the ICN data analysis program.
- Dispose of all your chemical samples. Although the samples are nontoxic, you should dispose of them in the labeled waste or used-materials containers provided. Clean all of your cuvettes and glassware. Return all of your supplies to their proper place. Wipe down your lab area to clean up any spills.
*Individualized assignments from the Lab Navigator
Post- Lab Assignment
Your lab report should include the following information.
1. Name, partner name, date, title
2. Data in table or graph form
- To analyze your spectra, click on the spectral analysis button on the main ICN screen. Enter your account name and password. Your spectra files should appear. Click on a file to display the spectra.
- For the blue, red, and yellow solutions, determine the wavelength and maximum absorbance for each color. See example below. Include the wavelength and maximum absorbance for each color in a table.
Example
The maximum absorbance is the absorbance reading (y-axis) for the top of the peak. The wavelength for the maximum absorbance peak is read from the x-axis. The shape and the location of the peaks in UV-visible spectra are defined by the wavelength and maximum absorbance.- Label and print the graphs for the blue, red, and yellow solutions. You can "zero in" on the spectra by changing the X and Y axis. For example, you can change the absorbance scale by highlighting the "4" and typing in 1.
- Display your assigned color. Determine the wavelength and maximum absorbance for your assigned color. Compare this spectra with the three primary colors-blue, red, and yellow. A secondary color will contain two or more peaks at the same wavelength as the peaks for primary colors. What primary colors are in your assigned color?
- Label the primary colors in your assigned color and print the graph.

